In the past, we have introduced the “imager” and “EBImage” packages for image manipulation. Although these packages are useful, this package is recommended because it can easily perform the desired processing.
In addition to basic image loading, saving to a specific image format such as pmg, rotating, cropping, and resizing, you can also apply filters such as blur, noise, negative processing, and edge processing. Morphing and other processing is also possible.
I hope that you will check each execution command for yourself and realize the usefulness of this package.
Package version is 2.7.3. Checked with R version 4.2.2.
Install Package
Run the following command.
#Install Package
install.packages("magick")
Example
See the command and package help for details.
#Loading the library
library("magick")
#Loading images: image_read command
#Load the banner "KARADA GOOD" from the web.
#Of course, you can also load images from your local environment
KaradaBanner <- image_read('https://www.karada-good.net/wp/wp-content/uploads/2015/08/4d45f652babef5b63a8c2a5f85c9885d.jpg')
#Display image information: image_info command
image_info(image = KaradaBanner)
format width height colorspace filesize
JPEG 986 149 sRGB 78164
#Converting Image Formats: image_convert command
#Specify format: format option; png,jpeg,gif,pdf
ConvertImg <- image_convert(image = KaradaBanner, format = "pdf")
image_info(image = ConvertImg)
format width height colorspace filesize
pdf 986 149 sRGB 0
#Save image: image_write command
#Specify a storage location using the tcltk package
library("tcltk")
setwd(paste(as.character(tkchooseDirectory(title = "Save Directory"), sep = "", collapse ="")))
#Specify save file name: path option
#Specify format: format option; png,jpeg,gif,pdf
image_write(KaradaBanner, path = "test.pdf", format = "pdf")
#Displaying images: image_browse command
#Displayed by software set up in the system according to the image format
image_browse(image = KaradaBanner)
#Adding a border around an image: image_border command
#Specify color: color option
#Border thickness in pixels: geometry option; left/right x up/down
image_border(image = KaradaBanner, color = "blue", geometry = "15x10")
#Trimming images: image_trim command
image_trim(image = KaradaBanner)
#Crop image: image_crop command
#Specify size position to crop: geometry option;
#width x height {+-}X axis start position {+-}Y axis start position
image_crop(image = KaradaBanner, geometry = "140x150+100-30")
#Image resizing: image_scale command
image_scale(image = KaradaBanner, geometry = "400x600")
#Image rotation: image_rotate command
#Specify angle: degrees option
image_rotate(image = KaradaBanner, degrees = 30)
#Flip image upside down: image_flip command
image_flip(image = KaradaBanner)
#Flip image left and right: image_flop command
image_flop(image = KaradaBanner)
#Image Fill: image_fill command
#Specify reference point:point option
#Specify boundary area: fuzz option; range from 0 to 100
image_fill(image = KaradaBanner, point = "200x130", color = "yellow", fuzz = 20)
#Image blurring: image_blur command
#Increasing the Radius and Sigma values results in more blur
image_blur(image = KaradaBanner, radius = 1, sigma = 1)
#Adding noise to an image: image_noise command
#Specify noise treatment: noisetype option; #Uniform,Gaussian,Impulse,Laplacian,Poisson
image_noise(image = KaradaBanner, noisetype = "Poisson")
#Border the image:image_charcoal command
image_charcoal(image = KaradaBanner, radius = 1, sigma = 0.5)
#Oil painting of images: image_oilpaint command
image_oilpaint(image = KaradaBanner, radius = 0.5)
#Image edge processing: image_edge command
image_edge(image = KaradaBanner, radius = 1)
#Image Negativity: image_negate command
image_negate(image = KaradaBanner)
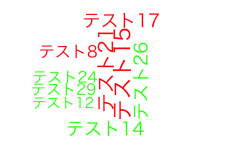
#Adding text to an image: image_annotate command
#Specify text: text option
#Specify text size: size option
#Set display position:gravity option;
#Forget,NorthWest,North,NorthEast, West,Center,East,SouthWest
#Character background color: boxcolor option
image_annotate(image = KaradaBanner, text = "Karada-Good", size = 70,
gravity = "West", color = "green", boxcolor = "lightblue")
#Combine multiple images into one: image_mosaic command
#Loading the "KARADA GOOD" banner
KaradaBanner <- image_read('https://www.karada-good.net/wp/wp-content/uploads/2015/08/4d45f652babef5b63a8c2a5f85c9885d.jpg')
#Load R logo
logo <- image_read("https://www.r-project.org/logo/Rlogo.png")
#Merge and resize images
img <- image_scale(c(logo, KaradaBanner), "300x300")
#Plot
image_mosaic(image = img)
#Displaying multiple images side by side: image_append command
#Display vertically: STACK option; horizontally with FALSE
AppendImg <- image_append(img, stack = FALSE)
image_background(image = AppendImg, "red")
#Store between images with specified frames:image_morph command
#Specify number of frames: frames option
GifAnime <- image_morph(img, frames = 30)
#Animating a "magick image object" created with
#the image_morph command: image_animate command
#fps: fps option
#Repeat settings: loop option; 0 for repeat, 1 for do not repeat
image_animate(GifAnime, fps = 10, loop = 0)
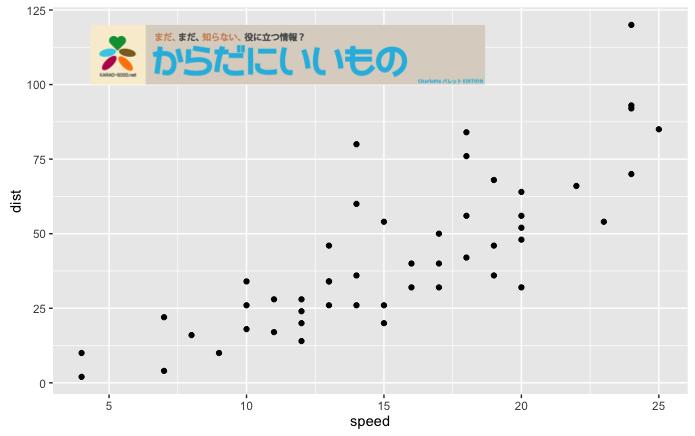
#Reference_Add image to graph; same as raster image plot
plot(cars)
rasterImage(image_scale(KaradaBanner, "600x400"), 5, 100, 20, 120)
#For ggplo2 package
library("ggplot2")
library("grid")
#rasterGrob command
RasterData <- rasterGrob(KaradaBanner, interpolate = TRUE)
#Add annotation_custom command
ggplot(data = cars, aes(speed, dist)) + geom_point() +
annotation_custom(RasterData, xmin = 3, xmax = 20,
ymin = 100, ymax = 120)Output Example
Please try to run the other commands. It is very interesting.
・Image Negativity: image_negate command

・Reference_Add images to graphs: Combination with ggplot2 package
・image_animate comand

I hope this makes your analysis a little easier !!