One way to get the color code used in an image is to use image editing software.
“Playing with R: Could it be used for color schemes in presentation materials? Character hair color?” But I loaded the image into Photoshop and used an eyedropper to get the color code. That is a very time-consuming process.
Therefore, we came up with “a method to obtain the TOP 5 most used color codes from the color codes of all pixels in the target image in R”.
The code presented uses the “EBImage” package, which can process images and retrieve information in R. The EBImage package can be easily installed from bioconductor using the bioLite command.
The version of “EBImage” package is 4.6.0.
In addition, Bioconductor is a website that provides a bioinformatics analysis package that can be used from R.
URL:http://www.bioconductor.org/

Other recommended packages for getting color codes from images
Recommended package.
Install Package
Run the following command.
source("http://bioconductor.org/biocLite.R")
biocLite("EBImage")
Examples
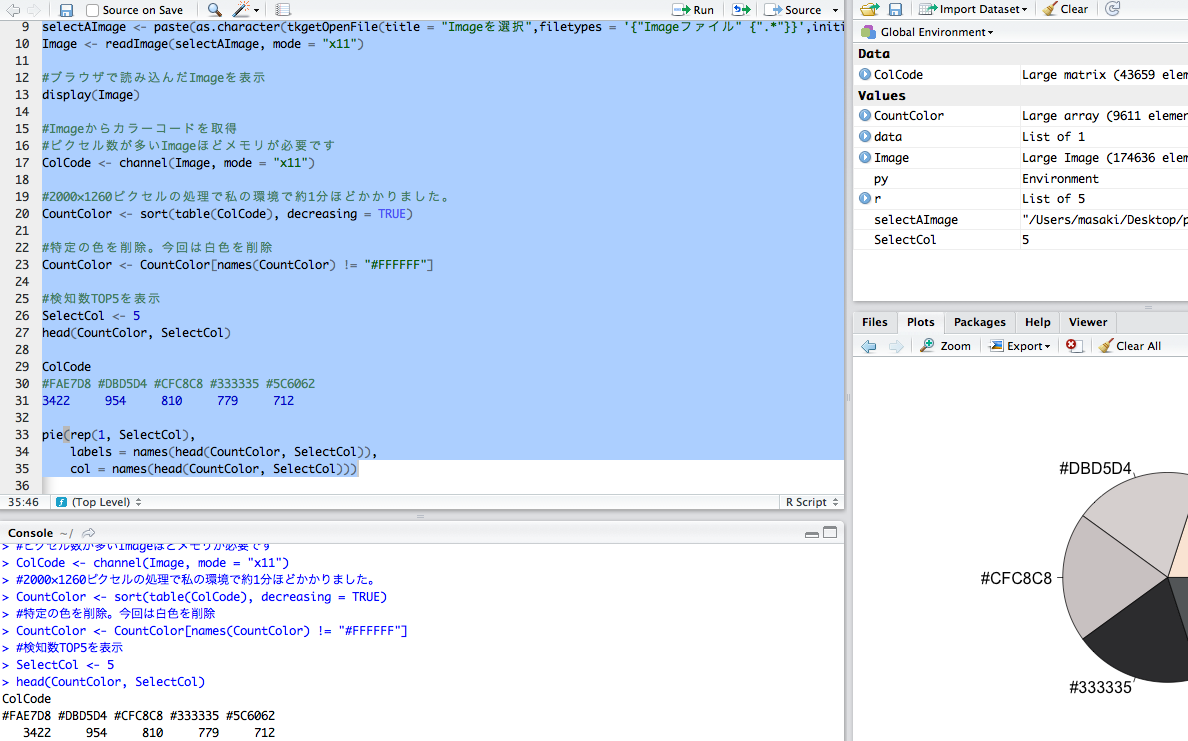
The tcltk package is used so that image files can be selected in a dialog.
This time we use the full-length picture of “Yukino Yukinoshita” from “After all, my coming-of-age romantic comedy is wrong”. The image used this time is the full-shoulder shot of “Yukino Yukinoshita” from “After all, my coming-of-age romantic comedy is wrong.
URL:http://www.tbs.co.jp/anime/oregairu/

Picture used.
Note that processing 2000 x 1260 pixels takes about 1 minute on a Mac mini (Late 2012) with 16GB of memory.
library("EBImage")
#Loading Image Files
selectAImage <- paste(as.character(tkgetOpenFile(title = "Select Image",filetypes = '{"Image File" {".*"}}',initialfile = "*.*")), sep = "", collapse =" ")
Image <- readImage(selectAImage, mode = "x11")

#Display the loaded image in the browser
display(Image)

#Get color code from Image
#The more pixels an image has, the more memory it requires.
ColCode <- channel(Image, mode = "x11")

#Sort
CountColor <- sort(table(ColCode), decreasing = TRUE)

#Delete a specific color. In this case, remove white color.
CountColor <- CountColor[names(CountColor) != "#FFFFFF"]

#TOP5
SelectCol <- 5
head(CountColor, SelectCol)

ColCode
#FAE7D8 #DBD5D4 #CFC8C8 #333335 #5C6062
3422     954     810     779     712

pie(rep(1, SelectCol),
    labels = names(head(CountColor, SelectCol)),
    col = names(head(CountColor, SelectCol)))
Output Example
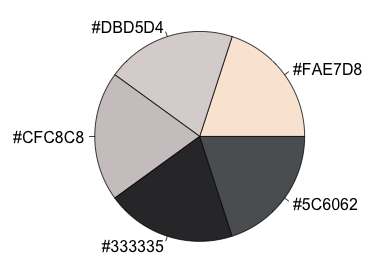
Image processing commands
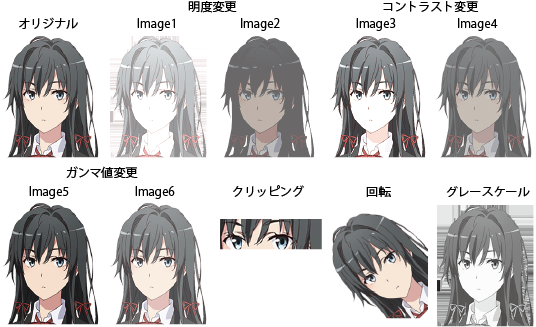
The “EBImage” package allows you to change image brightness, contrast, gamma, color mode, cropping, rotation, etc.
#Lightness is specified with "+" or "-"
#Light
Image1 <- Image + 0.4
display(Image1)
#Dark
Image2 <- Image - 0.4
display(Image2)

#Contrast is specified by "*"
#Light
Image3 <- Image * 1.3
display(Image3)
#Dark
Image4 <- Image * 0.7
display(Image4)

#Gamma value is specified by "^"
#Hight
Image5 <- Image ^ 1.3
display(Image5)
#Low
Image6 <- Image ^ 0.7
display(Image6)

#Clipping is also possible
#It is convenient to use the display command to
#display the image and get the coordinates of the area
#The specification is [x-axis range (width), y-axis range (height),]
display(Image[39:159, 87:122,])

#Rotation is possible
#translate(rotate(Image, Rotate with "+" or "-"), Origin of rotation)
display(translate(rotate(Image, -45), c(0, 0)))

#Color channels can be changed
colorMode(Image) <- Grayscale
display(Image)

#Easy to return to color
colorMode(Image) <- Color
Output Example
I hope this makes your analysis a little easier !!