Analysis in R: Example of creating a relatively simple “Loupedeck” shortcut command plugin
This is an introduction to creating a plugin for the “Loupedeck” shortcut command from the “Keyboard Shortcuts” table using Excel (OpenOffice Calc is also acceptable, xlsx file format only), R and Visual Studio in a Windows environment. The “C# Source File” template is continuously processed in R, which reduces the load a bit.
In the introduction, we created a “C# Source File” for each shortcut command after editing the “Keyboard Shortcuts” table in the “KaradaLoupedeck” package published on Github. The “C# Source File” created in “Visual Studio Community” was loaded and built. Create a plugin for the “RStudio_1.4.1103” shortcut command and confirm that it works with “Loupedeck Live S”. Also, dynamic mode is supported.
I have not confirmed that it works except in the macOS environment and Loupedeck Live S. However, we believe it works by modifying the R code and C# template.
It takes a little time to create a table summarizing “keyboard shortcuts,” but the rest of the work is almost automatic, so the time required to create plug-ins for shortcut commands can be significantly reduced.
<おすすめのRに関する書籍です>

Loupedeck is required
Naturally, you will need a Loupedeck. I recommend the Loupedeck Live S because of its size and price.
Plugin that can be created by referral
The following plug-in can be created and installed from the Loupedeck software.
Required Software
The software required is “Excel” or “Calc in OpenOffice”, “R Statics and RStudio”, “Visual Studio Community”, and “Loupedeck software”. All but Excel are free of charge. Here are the download links for each software. Please install the software after downloading.
・OpenOffice:Version 4.1.14
・R Statics:Version 4.3.0
・RStudio:Version 2023.03.0+386
https://posit.co/download/rstudio-desktop/
・Visual Studio Community 2022:Version 17.5.4
https://visualstudio.microsoft.com/ja/free-developer-offers/
・Loupedeck:Version 5.6.2
https://support.loupedeck.com/loupedeck-software-download
Steps to create a shortcut command plugin
Procedure.
- Prepare your project with the Loupedeck Plugin SDK
- Create a “keyboard shortcut” in “xlsx format” using Excel or OpenOffice Calc.
- Install the KaradaLoupedeck package from RStudio using “devtools::install_github(“MasakiFujishima/KaradaLoupedeck”)”. Create “KG_Shortcut.xlsx” file by reading the table of keyboard shortcuts with the command “kg_scef_tidy”. Read “KG_Shortcut.xlsx” and create a “C# Source File” for each shortcut command using the “kg_csfiles_create” command.
- “C# Source File” created by “Visual Studio Community” is loaded and built. The plugin is then installed in “Loupedeck”.
That’s all. We will introduce them in order from the next.
Prepare your project with the Loupedeck Plugin SDK
Step 1. Download the Loupedeck Plugin SDK
After installing Visual Studio Community, download “LoupedeckPluginSdkToolkit_5.6.0.15957_win.zip” from Save it in the “Download Folder” folder, unzip it and rename the folder to “LoupedeckPluginToolUnpacked”.
Loupedeck Plugin SDK tool for Windows:https://support.loupedeck.com/loupedeck-plugin-sdk-tools-for-windows
Step 2. Configuring the Loupedeck Plugin SDK
Execute the following command at the command prompt.
cd %USERPROFILE%\Source
%USERPROFILE%\Downloads\LoupedeckPluginToolUnpacked\LoupedeckPluginTool.exe generate -name="KgRstudio"
Note that the Visual Studio project name “”KgRstudio”” at the end of the command should be changed as necessary. It is recommended to run the command as is at first.The bottom two lines of the command example above are examples of changes.
Paste “%USERPROFILE%\Source” into the folder’s address bar and run it to create the “KgRstudioPlugin” folder.
Create a “Table of Keyboard Shortcuts”
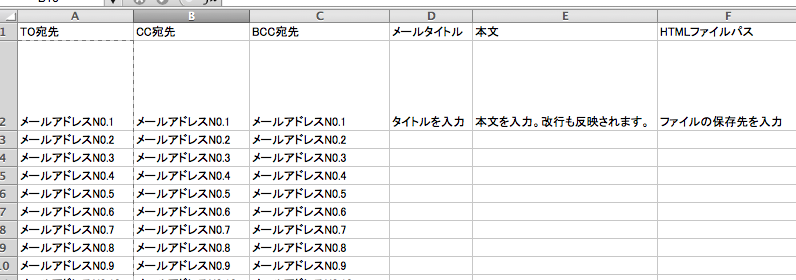
Create a table of keyboard shortcuts in Excel or OpenOffice Calc. The data in the table are, from left to right, Category, Icon_Fill_Color, Icon_Text_Color, Description, Windows, and Mac. The properties of each data are as follows.
- Category: Text displayed in the “Loupedeck Software” category.
- Icon_Fill_Color:The fill color is set to the button icon.
- Icon_Fill_Color: The fill color is set to the button icon.
- Description: Content to be displayed in button text.
- Windows/Mac: Shortcuts for each OS. Keys are connected by +. No space.
keybord_shortcut_RStudio_1.4.1103.xlsx” as reference data. It can be downloaded from the following link. It will be used in the command examples starting in the next section.

Install required packages
After installing R and RStudio, the “KaradaLoupedeck” package, which is available on Github, is installed on R. Github is constantly modifying and adding functionality to this package.
Github:”KaradaLoupedeck” package
https://github.com/MasakiFujishima/KaradaLoupedeck/tree/main
Execute the following command.
#If the devtools package is not present, comment out the following and run.
#install.packages("devtools")
devtools::install_github("MasakiFujishima/karadaLoupedeck")
library("karadaLoupedeck")
Create a “C# Source File” using the “KaradaLoupedeck” package.
Step 1. Prepare the appearance of a table summarizing the shortcuts.
Use the “kg_scef_tidy” command to tidy up the appearance of the table summarizing the shortcuts. The “keybord_shortcut_RStudio_1.4.1103.xlsx” introduced earlier is processed with the following command.
When executed, “KG_Shortcut.xlsx” will be created in the location where the processing file is saved.
###Load a table#####
library("tcltk")
xlsxFile <- paste0(as.character(tkgetOpenFile(title = "xlsx select",
filetypes = '{"xlsx" {".xlsx"}}',
initialfile = c("*.xlsx"))))
########
###pecify where to save the processing file#####
setwd(paste0(as.character(tk_choose.dir())))
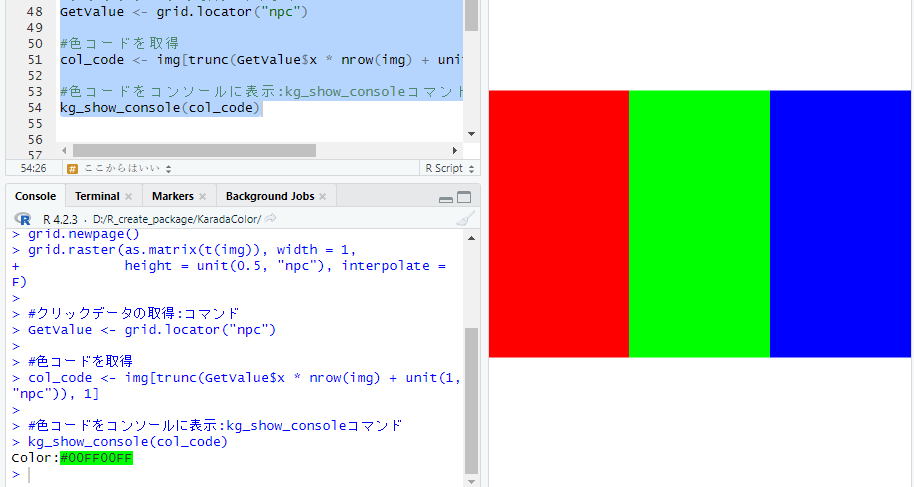
#Edit a table of shortcuts: kg_scef_tidy command
#Path of table to process:xlsxFile option
Fill color column to display in #Loupedeck: fillcol; default 2
#Columns of text color to display in Loupedeck: textcol; default 2
#Number of table columns to process:ncol
#Target OS:selectOS; initial value windows,macOS not yet considered
kg_scef_tidy(xlsxFile = xlsxFile)Reference: Contents of “KG_Shortcut.xlsx”. RGB value” and “FunName” obtained from each fill color, “MK (ModifierKey)” and “VK (VirtualKeyCode)” obtained from keyboard shortcut commands are added to “Icon_Fill_Color” and “Icon_Text_Color”. MK and VK are commands used in “C# Source File”.

Step 2. Create a “C# Source File” from “KG_Shortcut.xlsx
Create a “C# Source File” from “KG_Shortcut.xlsx” using the “kg_csfiles_create” command. The lpname option should be the “project name” that was set in the “Preparing the Loupedeck Plugin SDK” section. In this example, it is “KgRstudio”.
When executed, a “C# Source File” will be created at the location specified during the process. In the example, 200 source files are created.
###Load a "KG_Shortcut.xlsx"#####
library("tcltk")
xlsxFile <- paste0(as.character(tkgetOpenFile(title = "Select xlsx",
                                              filetypes = '{"xlsx" {".xlsx"}}',
                                              initialfile = c("*.xlsx"))))
########

#Create a "C# Source File" from "KG_Shortcut.xlsx":kg_csfiles_create command
#Path of the table to be processed:xlsxFile option
#Project name:lpname option
#Destination of the C# Source File:savepath option
#It is easier to use #tk_choose.dir() command
kg_csfiles_create(xlsxFile, lpname = "KgRstudio",
                  savepath = paste0(as.character(tk_choose.dir())))
Example of C# Source File output
namespace Loupedeck.KgRstudio
{
    using System;

    public class AcceptSelectedCandidate : PluginDynamicCommand
    {
        public AcceptSelectedCandidate()
        : base(displayName: "Accept Selected Candidate", description: "Accept Selected Candidate", groupName: "Completions (Console and Source)")
        {
        }
        protected override BitmapImage GetCommandImage(String actionParameter, PluginImageSize imageSize)
        {

            var ResourcePath = EmbeddedResources.FindFile("Completions (Console and Source).png");

            using (var bitmapBuilder = new BitmapBuilder(imageSize))

            {
                if (ResourcePath == null)
                {
                    bitmapBuilder.FillRectangle(0, 0, 80, 80, new BitmapColor(229,212,232));
                    bitmapBuilder.DrawText("Accept Selected Candidate", color: new BitmapColor(23,42,19));
                    return bitmapBuilder.ToImage();
                }
                else
                {
                    bitmapBuilder.SetBackgroundImage(EmbeddedResources.ReadImage(ResourcePath));
                    bitmapBuilder.DrawText("Image", color: new BitmapColor(23,42,19));
                    return bitmapBuilder.ToImage();
                }
            }
        }
        protected override void RunCommand(String actionParameter)
        {
            this.Plugin.ClientApplication.SendKeyboardShortcut(VirtualKeyCode.Tab);
        }
    }
}
This completes our work in R. Next, we will work with “Visual Studio Community”.
Working with Visual Studio Community
Double-click “KgRstudioPlugin.sln” in “src” in the folder created in “Preparing the Loupedeck Plugin SDK” to start Visual Studio Community 2022. Saving the “KgRstudioPlugin.sln” shortcut on the desktop will make future work easier.
Step 1. Preparing the Loupedeck plugin
Double-click “KgRstudioPlugin.sln” to start Visual Studio Community 2022. After launching, go to “Solution Explorer” and modify “KgRstudioApplication.cs” to the following contents. This is the setting for dynamic support.
namespace Loupedeck.KgRstudioPlugin
{
    using System;

    // This class can be used to connect the Loupedeck plugin to an application.

    public class KgRstudioApplication : ClientApplication
    {
        public KgRstudioApplication()
        {
        }

        // This method can be used to link the plugin to a Windows application.
        protected override String GetProcessName() => "RStudio";

        // This method can be used to link the plugin to a macOS application.
        protected override String GetBundleName() => "";

        // This method can be used to check whether the application is installed or not.
        public override ClientApplicationStatus GetApplicationStatus() => ClientApplicationStatus.Unknown;
    }
}
Next, from the “Solution Explorer”, modify “KgRstudioPlugin.cs” to the following contents.
namespace Loupedeck.KgRstudioPlugin
{
using System;
// This class contains the plugin-level logic of the Loupedeck plugin.
public class KgRstudioPlugin : Plugin
{
// Gets a value indicating whether this is an Universal plugin or an Application plugin.
public override Boolean UsesApplicationApiOnly => false;
// Gets a value indicating whether this is an API-only plugin.
public override Boolean HasNoApplication => false;
public KgRstudioPlugin() => PluginLog.Init(this.Log);
// This method is called when the plugin is loaded during the Loupedeck service start-up.
public override void Load()
{
}
// This method is called when the plugin is unloaded during the Loupedeck service shutdown.
public override void Unload()
{
}
}
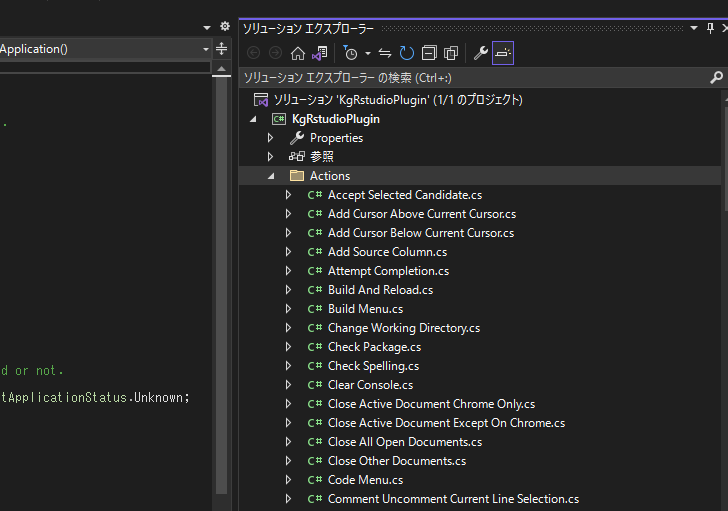
}Next, copy the “C# Source File” created using the “kg_csfiles_create” command to the “Actions” folder. Drag and drop is also acceptable. It will look like the following. You may delete the existing files in the “Actions” folder.
Reference: “C# Source File” example of original command
Here is an example of the original command “C# Source File”. It would be faster to duplicate one of the “C# Source File” that you just added to the “Actions” folder and paste the following contents to create it.
Is not recommended because it is more cumbersome to adjust than the shortcut command.
The contents create a new R script and write the installation and loading commands.
namespace Loupedeck.KgTestPlugin
{
    using System;

    public class OriginalAction : PluginDynamicCommand
    {
       // private readonly String[] _names = new[] { "(VirtualKeyCode.KeyR, ModifierKey.Control | ModifierKey.Shift);", "Liam Smith" };

        public OriginalAction()
            : base(displayName: "Create original new R script", description: "Create original new R script", groupName: "Original")
        {
        }
        protected override BitmapImage GetCommandImage(String actionParameter, PluginImageSize imageSize)
        {

            var ResourcePath = EmbeddedResources.FindFile("Original.png");

            using (var bitmapBuilder = new BitmapBuilder(imageSize))

            {
                if (ResourcePath == null)
                {
                    bitmapBuilder.FillRectangle(0, 0, 80, 80, new BitmapColor(153, 204, 0));
                    bitmapBuilder.DrawText("Create original new R script", color: new BitmapColor(0, 0, 0));
                    return bitmapBuilder.ToImage();
                }
                else
                {
                    bitmapBuilder.SetBackgroundImage(EmbeddedResources.ReadImage(ResourcePath));
                    bitmapBuilder.DrawText("Image", color: new BitmapColor(0, 0, 0));
                    return bitmapBuilder.ToImage();
                }
            }
        }

        protected override void RunCommand(String actionParameter)
        {

            this.Plugin.ClientApplication.SendKeyboardShortcut(VirtualKeyCode.KeyN, ModifierKey.Control | ModifierKey.Shift);
            this.Plugin.ClientApplication.SendKeyboardShortcut(VirtualKeyCode.NumPad1, ModifierKey.Control);
            this.Plugin.ClientApplication.SendKeyboardShortcut(VirtualKeyCode.F12, ModifierKey.Control);
            this.NativeApi.GetNativeMethods().SendString("#Install the HogeHoge package if it is not already there");
            this.Plugin.ClientApplication.SendKeyboardShortcut(VirtualKeyCode.Return);
            this.NativeApi.GetNativeMethods().SendString("if (!require(\"HogeHoge\", quietly = TRUE)) {");
            this.Plugin.ClientApplication.SendKeyboardShortcut(VirtualKeyCode.Return);
            this.Plugin.ClientApplication.SendKeyboardShortcut(VirtualKeyCode.Return);
            this.NativeApi.GetNativeMethods().SendString("install.packages(\"HogeHoge\");require(\"HogeHoge\")");
            this.Plugin.ClientApplication.SendKeyboardShortcut(VirtualKeyCode.Return);
            this.Plugin.ClientApplication.SendKeyboardShortcut(VirtualKeyCode.End, ModifierKey.Control);
            this.Plugin.ClientApplication.SendKeyboardShortcut(VirtualKeyCode.Return);
            this.Plugin.ClientApplication.SendKeyboardShortcut(VirtualKeyCode.Return);
            this.NativeApi.GetNativeMethods().SendString("#Loading the library");
            this.Plugin.ClientApplication.SendKeyboardShortcut(VirtualKeyCode.Return);
            this.NativeApi.GetNativeMethods().SendString("library(\"HogeHoge\")");

        }
    }
}
Step 2. Putting the Loupedeck plugin in shape
How to set up icon files for plugin and buttons. The “C# Source File” created in this article prepares a png file with the same name as the “Category” of each keyboard shortcut, which sets the preferred image as the background. Example “Build.png”.
Step 3. Plugin icon file
Create the image using “GIMP” or other software, referring to the “Icon XXXX.png” file in the “metadata” folder. Image sizes are “16 px * 16 px”, “32 px * 32 px”, “48 px * 48 px”, and “256 px * 256 px”.
Step 4. Button icon file
Create a “Resours” folder from “Solution Explorer” and save it as “”Category name”.png” of “80 px * 80 px”.
Note: After saving each button icon file in the “Resours” folder, be sure to change the “Build Action” in the “Properties” of each file to “Embedded Resource”. Otherwise, it will not be adapted.
For reference, an Illustrator template file of “80 px * 80 px” is shown below.
Step 5. Modification of LoupedeckPackage.yaml
Modify the contents of “LoupedeckPackage.yaml” in the “metadata” folder using Visual Studio. The following is an example of the modification.
type: plugin4
name: KgRstudio
displayName: KG_RStudio
version: 1.0

author: Masaki Fujishima
copyright: Copyright © 2023 KARADA GOOD. All rights reserved.
license: MIT
licenseUrl: https://opensource.org/licenses/MIT

homePageUrl: https://www.karada-good.net
supportPageUrl: https://www.karada-good.net/analyticsr/r-774/

pluginFileName: KgRstudioPlugin.dll
pluginFolderWin: win

supportedDevices:
    - LoupedeckCtFamily
Creating a Loupedeck plugin
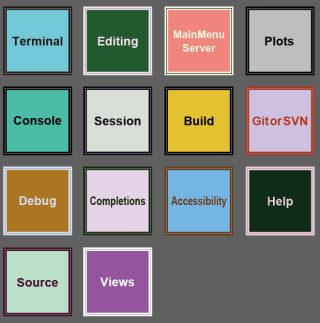
After connecting Loupdeck and executing “Build” -> “Build Solution” from the top menu of Visual Studio Community, “Loupedeck Software” will start after the build is completed and “KG_RStudio” will be successfully displayed in the “Application Profile”.
If you get an error, please check the file structure since the file structure is also available on Github. Please refer to the link “Publication on Github” at the bottom of this page.
Debugging and building with Visual Studio
If the Loupedeck software is running, debugging and building will fail; start the Visual Studio top menu “Tools” -> “Command Line” -> “Developer Command Prompt” and stop the Loupedeck software with the following comman.
cd C:\Program Files (x86)\Loupedeck\Loupedeck2
LoupedeckServiceTool.exe stop
After debugging or building is complete, start the Loupedeck software with the following command.
LoupedeckServiceTool.exe startPublication on Github
Ai files, icon files and “C# Source File” are available below.
https://github.com/MasakiFujishima/KgRstudioPlugin
Distribution of created plugin: For Marketplace
After confirming the contents of the folder name “KG_RStudioPlugin”, which will be saved in “%LOCALAPPDATA%\Loupedeck\Plugins\” after the build, zip the “metadata” and “win” folders in the folder together. After that, change the extension “.zip” to “.lplug4”.
To submit for Maketplace, please visit the following URL.
https://marketplace.loupedeck.com/contribute
If there are no problems with the content, fill in the required information and the application is complete.
I hope this makes your analysis a little easier !!