githubで紹介されていた、htmlファイルにボタンを描写するコマンドの紹介です。コマンドにはButtonMaker、DivMaker、TileMakerが収録されています。
・TileMaker
https://github.com/mexindian/TileMaker
各コマンド内容が参考になるので紹介します。
実行コマンドはwindows 7およびOS X 10.11.2のR version 3.2.3で確認しています。
実行コマンド
詳細はコメント、コマンドのヘルプを確認してください。
#コマンドの読み込み
source("https://raw.githubusercontent.com/mexindian/TileMaker/master/tilemaker.R")
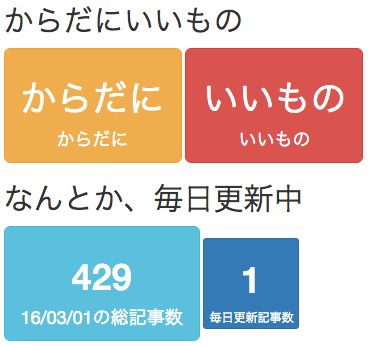
#ボタンを作成:ButtonMakerコマンド
Button1 <- ButtonMaker(Color = 2, Value = "からだに", Subtitle = "からだに")
Button2 <- ButtonMaker(Color = 3, Value = "いいもの", Subtitle = "いいもの")
Button3 <- ButtonMaker(Color = 4, Value = 429, Subtitle = "16/03/01の総記事数")
Button4 <- ButtonMaker(Color = 5, Size = 1, Value = 1, Subtitle = "毎日更新記事数")
#指定したボタン内容でdiv要素を作成:DivMakerコマンド
Div1 <- DivMaker(Title = "からだにいいもの", Buttons = paste(Button1, Button2))
Div2 <- DivMaker(Title = "なんとか、毎日更新中", Buttons = paste(Button3, Button4))
#作業フォルダへhtmlファイルを出力:TileMakerコマンド
TileMaker(MainTitle = "", Divs = paste(Div1, Div2), FileName = "TEST.html")
#出力したhtmlファイルをブラウザで表示:browseURL
browseURL("TEST.html")
#コード内容を紹介
#ButtonMaker
function(Color=1,Size=4,Value,Subtitle="",Link="",Icon="", Units="",
Target=0,ThresholdHigh=0,ThresholdLow=0, Hover=""){
## colors
colorList = c("success", "warning", "danger", "info", "primary", "default")
## sizes:
SizeList = c("xs","sm","md","lg")
## for icons, goto http://getbootstrap.com/components/
paste(paste('<',
if(Link !=""){paste('a href="',Link,'" role="button" ',sep='')} else{'button'},
' type="button" class="btn ',sep=''),
if(Target ==0){
paste('btn-',colorList[Color],sep='')
} else {
Perc <- Value/Target *100
if(Perc > ThresholdHigh){
'btn-success'
} else if(Perc< ThresholdLow){
'btn-danger'
} else {
'btn-warning'
}
},
paste(' btn-', SizeList[Size],
'"',
if(Hover !=""){paste(' title="',Hover,'" ')},
'><h1>',sep=''),
if(Icon !=""){paste(' <span class="',Icon,'" aria-hidden="true"></span> ',sep='')},
if(Units == ""){Value} else {paste(Value,Units,sep="")},
'</h1>',
Subtitle,
if(Link !=""){'</a>'} else{'</button>'},
sep="")
}
#DivMaker
function(Title="",Buttons){
paste('<div class="container"><h2>',
Title,
'</h2>',
Buttons,
'</div>',sep="")
}
#TileMaker
function(MainTitle="",Divs,FileName,ShowDate=FALSE,localCSS=FALSE){
cat('<!DOCTYPE html><html lang="en"><head>
<meta name="viewport" content="width=device-width, initial-scale=1">',
if(localCSS==TRUE){'<link rel="stylesheet" href="bootstrap.min.css">'
} else {'<link rel="stylesheet" href="http://maxcdn.bootstrapcdn.com/bootstrap/3.3.6/css/bootstrap.min.css">'},
'</head><body><h1>',
MainTitle,
'</h1>',
if(ShowDate){paste('<h2>Report Date: ',Sys.Date(),'</h2>',sep="")},
Divs,
'</body></html>',
file=FileName,sep="")
}出力結果
少しでも、あなたの解析が楽になりますように!!