 からだにいいもの
 Analysis in R: “flextable” package for outputting tables to Word and PowerPoint
This is an introduction to a package that allows you to output tables not only to html, but also to Word and PowerPoint files.
Package version is 0.6.10. Checked with R version 4.2.2.
<おすすめのRに関する書籍です>

Rで学ぶプログラミングの基礎の基礎 | 舟尾暢男
統計以前のプログラミングの考え方から始めるRの入門書。つまずきやすい部分を丁寧に扱う。
Install Package
Run the following command.
#Install Package
install.packages("flextable")
スポンサーリンク
Example
See the command and package help for details.
#Loading the library
library("flextable")
#Install the officer package if it is not already there
if(!require("officer", quietly = TRUE)){
  library("officer");require("officer")
}
#Install the tidyverse package if it is not already there
if(!require("tidyverse", quietly = TRUE)){
  install.packages("tidyverse");require("tidyverse")
}

###Creating Data#####
n <- 5
TestData <- data.frame("SubGroup" = sample(c("KA", "RA", "DA"),
                                           n, replace = TRUE),
                       "ID" = sample(letters[1:24], n, replace = FALSE),
                       "Area" = 1:n, "Point" = 0.1:(0.1*n),
                       "Facet" = sample(letters[1:2], n, replace = TRUE))
########

#Creation of flextable object: regulartable command
#Specify display columns: col_keys option
#Specify cell width: cwidth option
#Specify cell height: cheight option
FtObject <- regulartable(data = TestData, col_keys = names(TestData),
                            cwidth = 0.75, cheight = 0.25)

#Display of flextable object: print command
#Specify display format: preview option; "html", "pptx", "docx"
print(FtObject, preview = "html")

#Apply theme: theme_vanilla command
#Other:theme_booktabs,theme_box,theme_tron,theme_tron_legacy,theme_zebra
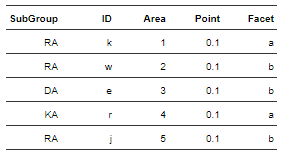
VFtObject <- theme_vanilla(FtObject)
print(VFtObject, preview = "html")

#Vertical grouping of cells: merge_v command
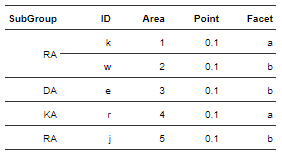
MvVFtObject <- merge_v(VFtObject, j = "SubGroup")
print(MvVFtObject, preview = "html")

#Automatic cell width-height adjustment: autofit command
FitMvVFtObject <- autofit(MvVFtObject)
print(FitMvVFtObject, preview = "html")

#Specify cell background color: bg command
#Specify column position: i option
#Specify row position: j option
#Specify color: bg option
#Specify by position: part option; "all", "body", "header"
BgFitMvVFtObject <- bg(FitMvVFtObject, i = c(3, 5), j = 2:4, bg = "red")
print(BgFitMvVFtObject, preview = "html")

#Specify text color:color command
#Specify color:color option
#Other options are the same as bg command
ColBgFitMvVFtObject <- color(BgFitMvVFtObject, i = 3, j = 2:4, color = "yellow")
print(ColBgFitMvVFtObject, preview = "html")

#Specify line color: border command
#Set color: border option; specified by fp_border(color = color)
#Other options are the same as for the bg command
BoColBgFitMvVFtObject <- border(ColBgFitMvVFtObject,
                                border = officer::fp_border(color = "green"),
                                part = "all")
print(BoColBgFitMvVFtObject, preview = "html")

#Specify character position: align command
#Specify position: align options; "left", "right", "center", "justify".
#Other options are the same as for the bg command
AlignFtObject <- align(BoColBgFitMvVFtObject, align = "center", part = "all")
print(AlignFtObject, preview = "html")

#Specify font size: fontsize command
#Specify font size: size option
#Other options are the same as bg command
SizeAlignFtObject <- fontsize(AlignFtObject, size = 9, part = "body")
print(SizeAlignFtObject, preview = "html")

#Make text bold: bold Command
BoldFtObject <- bold(SizeAlignFtObject, part = "header")
print(BoldFtObject, preview = "html")

#italic: italic command
ItaBoldFtObject <- italic(BoldFtObject, i = ~ Area > 3,
                             j = ~ Area, italic = TRUE)
print(ItaBoldFtObject, preview = "html")

#Introduction command adapted in bulk and output in Word
#officer package:read_docx command
#dplyr Package :%>% command
#flextable Package:body_add_flextable command
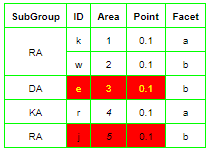
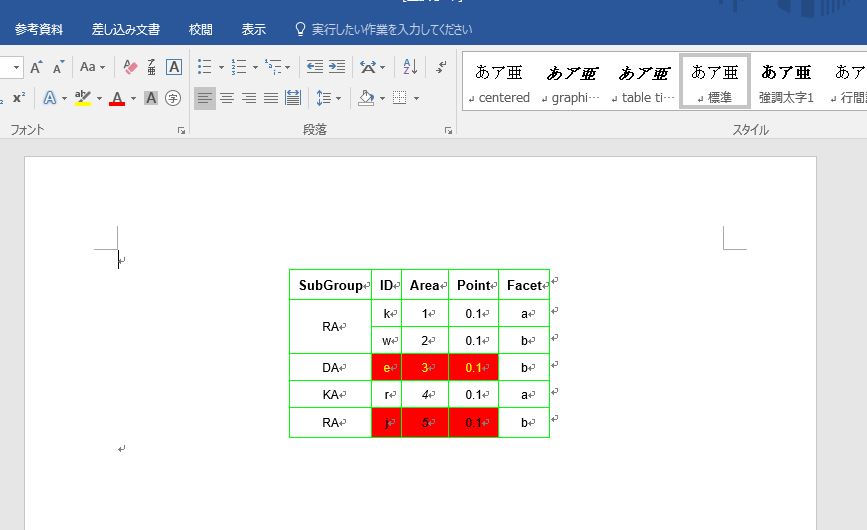
read_docx() %>%
  body_add_flextable(
    regulartable(data = TestData, col_keys = names(TestData),
                 cwidth = 0.75, cheight = 0.25) %>%
      theme_vanilla() %>%
      merge_v(j = "SubGroup") %>%
      autofit() %>%
      bg(i = c(3, 5), j = 2:4, bg = "red") %>%
      color(i = 3, j = 2:4, color = "yellow") %>%
      border(border = fp_border(color = "green"), part = "all") %>%
      align(align = "center", part = "all") %>%
      fontsize(size = 9, part = "body") %>%
      italic(i = ~ Area < 3, j = ~ Area, italic = TRUE)) %>%
  print(target = "Test.docx")

#Introduction batch adapt commands and output in PowerPoint
#officer package:read_ppptx command,add_slide command
#dplyr package:%>% command
#flextable Package:ph_with command
read_pptx() %>%
  add_slide(layout = "Title and Content", master = "Office Theme") %>%
  ph_with(location = ph_location(width = 1, height = 1,
                                 newlabel = "KARADAGOOD"),
    regulartable(data = TestData, col_keys = names(TestData),
                 cwidth = 0.75, cheight = 0.25) %>%
      theme_vanilla() %>%
      merge_v(j = "SubGroup") %>%
      autofit() %>%
      bg(i = c(3, 5), j = 2:4, bg = "red") %>%
      color(i = 3, j = 2:4, color = "yellow") %>%
      border(border = fp_border(color = "green"), part = "all") %>%
      align(align = "center", part = "all") %>%
      fontsize(size = 9, part = "body") %>%
      italic(i = ~ Area < 3, j = ~ Area, italic = TRUE)) %>%
  print(target = "Test.pptx")
Output Example
・theme_vanilla command
・merge_v command
・Introduction batch adapt commands
・Output Word
I hope this makes your analysis a little easier !!
![Rで楽しむベイズ統計入門[しくみから理解するベイズ推定の基礎] Data Science Library](https://m.media-amazon.com/images/I/519e2geAM2L._SL500_.jpg)

スポンサーリンク